
Bambu Lab 4th Anniversary Sale
- Bambu Lab 4th Anniversary Sale, with discounts up to 52% off.
- Free shipping within the US.
- Offer ends July 15th at 11:59 PM.
- Buy >>
 Buy
Buy  Buy
Buy  Buy
Buy  Buy
Buy 
Biggest Bambu Lab anniversary discount yet—this 3-second guide helps you breeze through your order! If you want to print functional parts like car accessories and outdoor tools that are durable and high-temperature resistant, go straight for the P1S or P2S. With the first-ever discount, grab an all-enclosed machine without regret; it handles tough engineering materials with ease and is the absolute "performance ceiling" for budget-conscious users.
If you're a high-budget player or a studio pro craving multi-head printing at once, zero wasted material, and doubled efficiency, then go all in with the X2D or H2C. Multiple print heads fire up simultaneously, completely eliminating color-switching waste; this ultimate "money printer" directly supercharges your productivity!
 Buy
Buy  Buy
Buy 
| Recommended Model | Features |
| A1 Combo
 | Beginner-friendly, easy entry into 3D printing
|
| P2S Combo
 | Advanced enthusiast, enclosed single print head
|
| H2C
 | For hardcore multi-color and material-saving players
|
| X2D Combo
 $899 (New item) | New black tech release, dual print head with a friendlier entry price
|
| A2L Combo
 | June launch new arrival, for printing larger-scale creative projects
|
Merchant reminder:
a. Payment information: Orders on the website are settled in US dollars. Multiple payment methods are accepted, including Alipay, Klarna, Visa, Mastercard, American Express, and PayPal.
b. Shipping information: Free shipping is included. Generally, orders are shipped within 1-3 business days. For details, please refer to the website's shipping policy👉
https://us.store.bambulab.com/policies/shipping-policy
How to assemble the Bambu Lab A1 Combo
// Assembling the Bambu Lab A1 Combo //
If you're feeling a little tempted to buy one after reading this, let's first assemble my A1 Combo together with Mashao, because it's actually a bit complicated. Watch this once and you'll get the hang of it. Then you can save this guide and refer to it along with the manual when your own unit arrives!

The package arrived as one big box. The future printer and AMS feeder will both sit on this little white IKEA table.

The first layer after unboxing. The gray one is the print bed. Be careful when opening the box, don't just slice it open recklessly. The white one is the instruction manual set.

The next layer down. The four round ones are the spindles for the AMS feeder. The V-shaped one is the AMS feeder base. On the other side of this foam are accessories like the power cable. Take them out separately and set the foam aside.

This is the printer's gantry. Take it out and lay it flat, but don't place the side wrapped in paper/cardboard facing down. That side has the print head's slide rod.
Next is the bottom-most layer. Just take everything out in order (nothing special to note, forgot to take a photo).

From left to right: Printer base, filament tube and white filament spool, filament spool holder for the gantry, the AMS feeder body (the one with two long rods and a dark gray object), the print bed in a plastic bag, the gantry, the print head (white with four black dots) hanging on the gantry, AMS base, four spindles.

The instruction manual pack. Inside, only the manual is needed, follow it step by step. There is no Chinese manual.

First, use the Allen key/L-shaped wrench from the manual pack to remove the limiters on the gantry. Also remove all the zip ties and cardboard from the gantry and base.

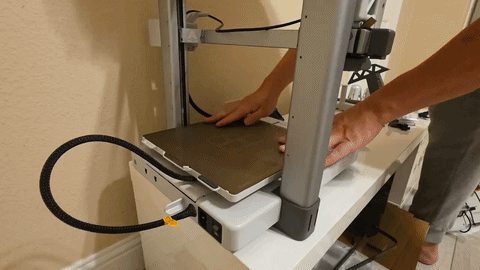
Align the print bed with the top ports and accurately attach it to the printer base.

Nest the base into the gantry as shown in the picture. There is a notch on each side, and it will align perfectly.
Push the print bed to the end opposite the power port, then pull out the cover plate inside the base. Looking back inside, you'll see several screw holes marked with green circles.

According to the screw types specified in the manual, find the corresponding parts bag (the parts bag packaging indicates what it's for). There will be spare parts left over after using the parts bag. After everything is assembled, you'll find there are still unused parts; these are for future replacement of accessories. Keep them safe.


Use the L-shaped wrench from earlier to install all the screws. There are 10 on the tail side and 2 on the head side in total. Remember to slide the print base to see them. After installing them all, put the cover plate you removed back on.

Lay the printer down like this, and we're ready to install the base wiring.

This cable comes from the print head. Insert the whole thing into the base through the gap underneath. There are three cables. First, we need to insert the USB-C cable. It's not very easy to insert; you'll feel a "click" when it's in. The other two cables have specific ports; just insert them accurately according to the foolproof design.
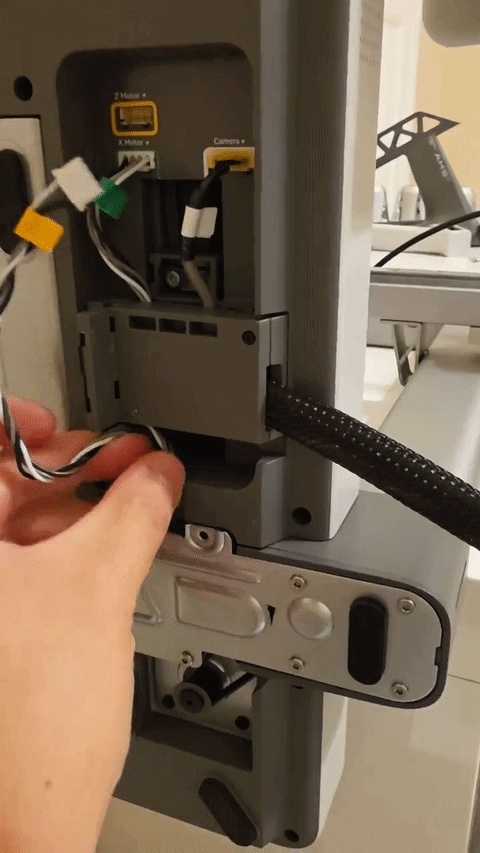
Then, we'll find a cable taped to the bottom edge. Remove the tape, route this cable along the hidden groove in the box we just inserted, and plug in the last separate connector. After everything is plugged in, we can stand the printer upright.
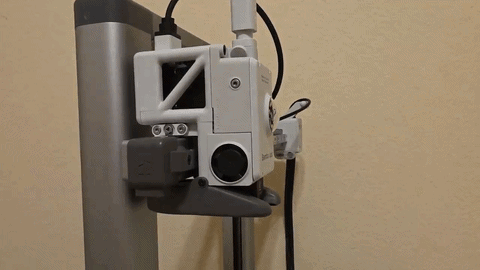
Push the print head to the middle and install the poop knife. This is because during printing, the nozzle produces a lot of waste material, and this tool is needed to cut it off. The cut-off material falls to the ground. This waste is affectionately called "poop." Poop can be used to fill the base of some printed objects to add weight, and some people grind it into powder and remelt it into filament.
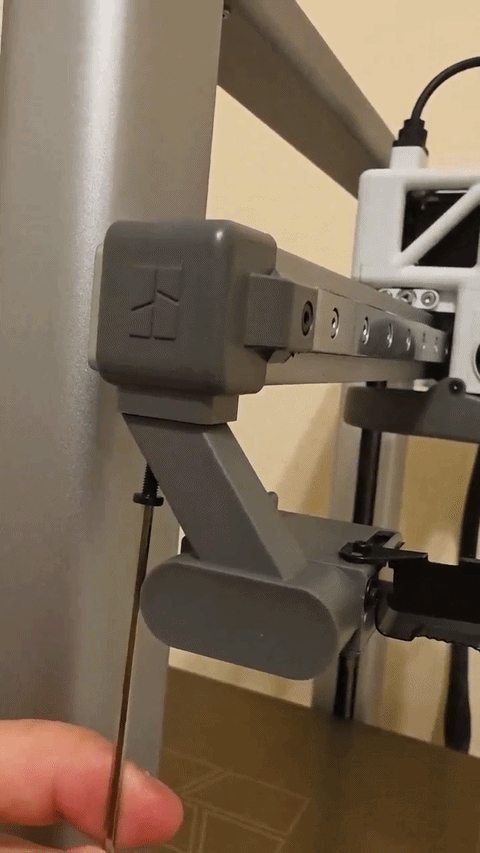
This step is to screw a screw into the poop knife. As long as you've installed it in the correct position, it will screw in.

For the AMS feeder, there are two screws on each side of the base and the body. Install them according to the required part types specified in the manual.

Spindles. There are four in total, two green and two yellow. The AMS has four posts, two green and two yellow. Install green to green, yellow to yellow. Make sure to push them all the way down. To remove, just pull directly; there are no other locking mechanisms.

Next, you can arrange the printer and feeder like this. The feeder should be placed about 50cm away from one side of the printer. The purpose is to give the filament enough distance so it doesn't get damaged.


Deals and coupons you may like

Scott Rapid-Dissolving Toilet Paper 48 Rolls $18.79$31.99

xyphoraportablefan Portable Mini Handheld Fan 4000mAh High Speed $6.99$9.99


Amazon Prime Day 2026 Officially Announced June 23–26

Owala FreeSip Stainless Steel Sports Water Bottle with Straw 24oz Pink $23.99$29.99


Bomves Electric Spin Scrubber 8 Brush Heads 90min Runtime $19.99$39.99

YOYATOO Folding Pocket Knife Heavy-duty Blade Wood Handle $4.99$9.99

SUCEXIFY Crevice Cleaning Brush 9 Pack Hard Bristle Household $2.99$9.99

Coming Soon: Kohl's Deal Days are almost here! From 6/23 -6/28


HAGBOU Fabric Scissors 10.5-Inch Champagne Gold $4.97$9.95

Command XL Heavyweight Picture Hanging Strips 20 lb 8 Pairs Black $4.41$11.99

ANGEL X2 Tankless RO Water Filter 700GPD $289.99$329.99

Kromapolis Frosted Window Film 17.5 x 78.7 Inch $6.79$7.99

Secopad Bathtub Non-Slip Stickers 24 PCS Clear $9.99$11.99

StorageWorks Foldable Fabric Organizer Bins Beige Stripes Large 3-Pack $23.99$25.99

Urban Infant Pipsqueak Small Gray Pillow 11x7 Inch $9.95$11.95

GOTRAX Collapsible Wagon 100L Green $35.99$60.00

Persil Ultra Pacs Laundry Detergent 42 Count $8.31$12.97

FSVGYY 32 Inch Black Outdoor Wind Chime $19.94$29.94

Coieaa Triple Hinged 5x7 Picture Frame Navy Blue $17.99$29.99

Nextmug Temperature-Controlled Coffee Mug 14oz Burgundy $99.95$129.95


TOMOLO Electric Candle Lighter $4.99$9.99

SanDream 2-Tier Metal Bathroom Organizer White $13.99$31.99

BESPILLOW Cervical Memory Foam Ergonomic Neck Pillow $14.99$35.99

Costco New Members get $40 shop card


Bug Hull 10-Tier Metal Shoe Rack 20-24 Pairs $16.99$25.50

Costco Membership Offer @ Groupon $65 Executive + $50 off

AliExpress June Choice Day Sale Starting from as low as $20

Westcott 14881 Non-Stick Titanium Scissors 5-Inch $3.50$10.19

Owala FreeSip Sway Insulated Stainless Steel Water Bottle 40oz Pink $35.99$44.99

Urban Outfitters Sale Up to 75% Off


